Arriving at your dream vacation rental should feel like the start of a relaxing getaway—not a heart-pounding sprint to neutralize danger zones before your curious crawler discovers them. Yet for parents of mobile babies and toddlers, that first walk-through often reveals a minefield of sharp corners, unstable furniture, and tantalizing hazards that seem to multiply by the minute. The challenge intensifies when you realize you can’t start drilling cabinet locks into someone else’s mahogany or affixing permanent gates to their custom staircase.
Temporary baby proofing in vacation rentals demands a completely different mindset than outfitting your own home. You’re working with unknown layouts, unpredictable surface materials, and the non-negotiable constraint of zero damage. This guide transforms that overwhelming arrival scramble into a systematic, stress-free process. We’ll explore the principles of non-damaging installation, room-by-room strategies that work in any rental configuration, and how to build a portable arsenal that weighs ounces, not pounds. Whether you’re heading to a beach condo, mountain cabin, or city apartment, you’ll learn to create a safe environment that lets your little one explore freely while preserving your security deposit—and your sanity.
Top 10 Temporary Baby Proofing for Vacation Rentals
Detailed Product Reviews
1. Inaya Complete Baby Proofing Kit - Child Safety Hidden Locks for Cabinets & Drawers, Adjustable Safety Latches, Corner Guards and Outlet Covers - Baby Proof Pack to Keep Your Child Safe at Home
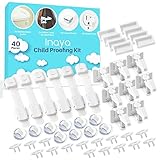
Overview: The Inaya Complete Baby Proofing Kit delivers a traditional yet comprehensive approach to child safety, bundling 40 essential pieces into one convenient package. Designed for children up to five years old, this kit addresses the most common household hazards without requiring any power tools or technical expertise. The collection includes six adjustable latches, eight invisible cabinet locks, 16 outlet covers, and 10 corner guards, providing coverage for multiple rooms. Installation relies on 3M adhesive backing, making it ideal for renters or parents hesitant to drill into furniture.
What Makes It Stand Out: This kit’s primary advantage lies in its all-in-one convenience and aesthetic discretion. The “invisible” locks mount inside cabinets, preserving your home’s visual appeal while creating a secure barrier against curious hands. The adjustable latches offer flexibility for various cabinet styles, from kitchen cupboards to bathroom drawers. The clear corner bumpers blend seamlessly with furniture, and the reusable outlet covers provide essential electrical protection. With video instructions and a one-year warranty, Inaya prioritizes customer success over complex technology.
Value for Money: At $29.99, this kit represents exceptional value compared to purchasing items separately, which could easily exceed $50. The comprehensive nature eliminates guesswork for new parents, and its gift-ready packaging makes it a practical baby shower present. While traditional solutions lack smart features, the cost-effectiveness and immediate usability justify the investment for families seeking straightforward protection without recurring costs or battery replacements.
Strengths and Weaknesses: Pros: Complete 40-piece solution; no-drill installation; preserves furniture aesthetics; excellent price point; includes multiple safety elements. Cons: Adhesive may weaken over time or damage surfaces upon removal; plastic components feel less premium; not suitable for older children who may figure out mechanisms; limited to basic functionality without remote monitoring.
Bottom Line: The Inaya kit is an ideal choice for parents prioritizing simplicity, affordability, and comprehensive coverage. While it won’t satisfy tech enthusiasts, it reliably addresses core childproofing needs without complexity, making it perfect for renters and those wanting immediate, fuss-free protection.
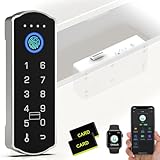
2. Smart Cabinet Lock, RFID Fingerprint Drawer Lock with Keypad Bluetooth APP, Biometric Electronic Digital Baby Proofing Cabinet Drawer Locks for Kitchen Cupboard Furniture

Overview: The Dhiedas Smart Cabinet Lock transforms childproofing into a high-tech security solution, offering five distinct unlocking methods in a single robust device. This electronic lock supports 100 fingerprints, 20 passcodes, Bluetooth app control, RFID cards, and even Apple Watch integration, eliminating the need for traditional keys. Constructed from break-resistant zinc alloy, it provides enterprise-level security for residential cabinets while maintaining an invisible profile that mounts discreetly inside furniture.
What Makes It Stand Out: The versatility of unlocking options sets this lock apart, accommodating every family member and caregiver scenario. The invisible mounting with 3M tape preserves furniture integrity, while the optional screw installation adds permanence. Energy-saving technology delivers a full year of operation on two AA batteries, and the USB-C emergency port eliminates lockout anxiety. The lock’s universal compatibility with various materials and hole diameters makes it adaptable to nearly any cabinet or drawer type.
Value for Money: Priced at $49.99, this smart lock commands a premium over traditional solutions but justifies the cost through multi-functionality and durability. A single device replaces several conventional locks while providing audit trails via the app and eliminating key management hassles. For families with multiple caregivers or those securing high-risk items like medications or cleaning supplies, the investment translates to enhanced peace of mind and long-term utility.
Strengths and Weaknesses: Pros: Five unlocking methods; invisible installation; year-long battery life; emergency USB-C power; robust zinc construction; app integration; Apple Watch support. Cons: Higher price point; batteries not included; initial setup requires smartphone; 3M tape may fail on heavy-use drawers; overkill for basic safety needs.
Bottom Line: This smart lock excels for tech-savvy parents seeking advanced security beyond basic childproofing. While the price and complexity exceed simple solutions, the convenience, durability, and multiple access methods make it a worthwhile investment for families prioritizing both safety and modern functionality.
3. Dhiedas Smart Cabinet Lock, RFID Fingerprint Drawer Lock with Keypad Bluetooth APP, Biometric Electronic Digital Baby Proofing Cabinet Drawer Locks for Kitchen Cupboard Furniture

Overview: Dhiedas delivers a sophisticated security upgrade for modern households with this feature-rich cabinet lock system. Engineered for versatility, the device accommodates up to 100 unique fingerprints and 20 passcodes while supporting Bluetooth app control, RFID compatibility, and Apple Watch unlocking. The zinc alloy construction ensures resistance against tampering, making it suitable for securing everything from kitchen cabinets to office desks. Installation flexibility allows use across various furniture types without permanent modification.
What Makes It Stand Out: The dual mounting approach distinguishes this lock, offering both damage-free 3M adhesive and traditional screw options based on user preference. The front-facing lock variant enables remote unlocking without opening the cabinet, ideal for granting temporary access to caregivers. The energy-efficient design extends battery life to approximately 12 months, while the integrated USB-C port provides emergency power. Its universal design eliminates concerns about compatibility with different cabinet materials or pre-existing hardware configurations.
Value for Money: At $49.99, the lock positions itself as a mid-range smart home device rather than a basic safety product. The cost becomes justified when securing multiple high-priority areas, as its durability outlasts several generations of adhesive-based solutions. The lifetime technical support adds long-term value, while the app-based management reduces replacement costs associated with lost keys or forgotten combinations. For families integrating smart home ecosystems, this represents a seamless, cost-effective security layer.
Strengths and Weaknesses: Pros: Multiple mounting configurations; emergency power backup; universal compatibility; robust metal construction; comprehensive customer support; app-based management. Cons: Requires technical comfort for setup; adhesive strength varies by surface; no included batteries; fingerprint sensor may struggle with wet fingers; limited warranty period for hardware defects.
Bottom Line: This lock suits households wanting flexible, powerful security without furniture damage. While demanding more involvement than basic latches, its adaptability and emergency features make it an excellent choice for renters and homeowners seeking professional-grade protection with consumer-friendly installation.
4. Dhiedas Smart Cabinet Lock, RFID Fingerprint Drawer Lock with Keypad Bluetooth APP, Biometric Electronic Digital Baby Proofing Cabinet Drawer Locks for Kitchen Cupboard Furniture
Overview: The Dhiedas Smart Cabinet Lock represents a durable, high-security approach to childproofing and access control, combining biometric technology with versatile installation options. This electronic system stores 100 fingerprints and 20 passcodes while offering Bluetooth app connectivity, RFID support, and Apple Watch integration. Crafted from heavy-duty zinc alloy, it withstands forced entry attempts better than plastic alternatives. The lock functions across diverse applications, from kitchen cupboards and liquor cabinets to metal filing boxes and pantry doors.
What Makes It Stand Out: Engineered for maximum durability, the zinc alloy body provides break-and-pick resistance that plastic locks cannot match. The invisible interior mounting keeps security discreet while maintaining furniture aesthetics. The device’s energy management system delivers extended battery life, and the USB-C emergency port ensures access even during power depletion. Its compatibility with various materials, including wood, metal, and composite surfaces, expands beyond typical childproofing applications into home office and commercial environments.
Value for Money: The $49.99 price reflects the premium materials and engineering rather than just smart features. While traditional locks cost significantly less, they lack the audit capabilities, multiple user management, and tamper resistance this device provides. The lifetime technical support offsets the shorter six-month warranty period, suggesting confidence in long-term reliability. For securing valuable or dangerous items, the investment prevents costly accidents and provides scalable security across multiple access points.
Strengths and Weaknesses: Pros: Exceptional build quality; universal material compatibility; invisible security profile; emergency USB-C power; scalable user management; lifetime technical support. Cons: Premium pricing; batteries not included; shorter hardware warranty; installation requires precision; may be excessive for simple childproofing needs.
Bottom Line: This lock targets security-conscious users needing robust protection beyond basic child safety. The metal construction and versatile application justify the cost for those prioritizing durability and tamper resistance, making it ideal for households with older children or for securing sensitive items in mixed-use environments.
Why Temporary Baby Proofing Presents Unique Challenges
Vacation rentals are designed for aesthetics and adult convenience, not child safety. Unlike your home where you’ve had months to gradually address hazards, you have mere minutes to secure an unfamiliar space before fatigue and curiosity collide. The stakes feel higher because you’re in an unfamiliar environment where you don’t know which kitchen cabinet contains cleaning supplies or how securely that antique dresser is anchored.
The Unknown Variables of Rental Properties
Every rental presents a unique fingerprint of risks. Wall textures vary from smooth drywall to rough plaster or even shiplap that rejects adhesives. Furniture quality ranges from bolted-to-the-wall built-ins to wobbly particleboard pieces that tip with a gentle tug. Flooring transitions from carpet to tile to hardwood, affecting how well suction cups or non-slip pads will grip. You might encounter spiral staircases, floor-to-ceiling windows, or decorative fireplaces—features that would never pass a home safety audit but look stunning on Instagram. The key is expecting variability and packing solutions versatile enough to handle anything.
Balancing Safety with Security Deposits
Your most effective home baby proofing solutions—drilled-in cabinet locks, wall-mounted gates, screwed-on outlet covers—are off-limits. This creates a psychological tension: you must achieve home-level safety without leaving a trace. Modern temporary solutions have evolved dramatically, using aerospace-grade adhesives that hold 50+ pounds yet remove cleanly, or tension mechanisms that generate hundreds of pounds of force without marring woodwork. Understanding which technologies actually work—and which leave sticky residue or pull paint—becomes critical for both your child’s safety and your financial protection.
Pre-Arrival Planning: Your First Line of Defense
The most successful vacation baby proofing begins before you zip your suitcase. Proactive planning eliminates 70% of arrival-day stress and ensures you pack precisely what you need—nothing more, nothing less.
Conducting a Virtual Hazard Assessment
Once you’ve booked, transform into a digital detective. Scour every photo in the rental listing with a safety-first lens. Zoom in on kitchen cabinets (Are there knobs for strap locks? Glass fronts showing hazards?), examine furniture placement (Is that tall lamp within grabbing distance of the crib?), and study floor plans for traffic patterns. Message your host requesting specific photos of outlets, stairs, and bathroom layouts. Most hosts happily oblige when you explain it’s for child safety. Create a prioritized hazard map: life-threatening risks (stairs, pools, balconies) at the top, inconvenience-level hazards (tupperware access) at the bottom.
Creating Your Travel Baby Proofing Kit
Think modular, not comprehensive. Your travel kit should be ruthlessly curated, with each item justifying its space and weight. Focus on multi-use tools: corner cushions that also work on hearth edges, adjustable straps that secure both cabinets and toilet lids, extendable gates that fit unpredictable openings. The ideal kit fits in a one-gallon zip-top bag and weighs under two pounds. Categorize items by installation method—adhesive, tension, strap, or barrier—to quickly match solutions to surfaces.
Communicating with Your Host Before Booking
Transparency builds cooperation. Before confirming your reservation, send a brief, friendly message explaining you’re traveling with a mobile infant and will be using temporary, non-damaging safety products. Ask about surface types (painted walls vs. wallpaper), custom features that can’t be modified, and any existing child-friendly amenities. Some premium rentals now provide basic safety kits—knowing this saves you packing space. This conversation also sets expectations; a host who balks at temporary solutions might not be the right fit for your family.
The Core Principles of Non-Damaging Installation
Mastering temporary installation is both science and art. The difference between a solution that holds firm and one that fails mid-trip often comes down to understanding the underlying physics and material compatibility.
Understanding Temporary Adhesive Technologies
Modern temporary adhesives use viscoelastic polymers that flow into microscopic surface irregularities, creating mechanical bonds that strengthen over 24-48 hours. Unlike old-school foam tape, these adhesives resist shear forces (the pulling motion toddlers apply) while releasing cleanly when stretched parallel to the surface. Look for products specifying “clean removal” with time limits (most guarantee 30 days without residue). Temperature affects performance—adhesives soften in heat and stiffen in cold, so allow adjustment time after installation in extreme climates.
Tension vs. Adhesion: Choosing the Right Method
Tension-based solutions (pressure-mounted gates, expandable rods) generate force by pushing outward against two surfaces. They excel in doorways with solid jambs but fail on drywall that compresses or tile that cracks. Adhesion-based solutions (stick-on locks, corner guards) rely on surface bonding and work anywhere but have weight limits. The hybrid approach often wins: a tension gate with adhesive cups at contact points distributes force and prevents slippage. For heavy furniture, use tension rods behind pieces to wedge them against walls, eliminating tipping risk without a single screw.
Surface Compatibility Considerations
The enemy of adhesion is texture. Smooth, non-porous surfaces (glass, sealed wood, laminate) achieve 90-100% bond strength. Matte paint, textured wallpaper, or porous stone achieve only 40-60%. Test an inconspicuous spot with painter’s tape—if it pulls paint, adhesives will too. For problematic surfaces, rely on tension, straps that loop around handles, or freestanding barriers. Always clean surfaces with isopropyl alcohol before applying adhesives; rental cleaning residues like Pledge or Murphy’s Oil Soap create invisible barriers that prevent bonding.
Room-by-Room Strategy: Living Areas
The living room often contains the highest concentration of tipping hazards and hard surfaces. Your approach must secure the space while preserving its functionality for adults.
Securing Furniture and Electronics
Start with the tipping triangle: anything taller than it is wide poses a risk. Even if you can’t anchor to walls, you can eliminate the leverage point. Move floor lamps behind sofas, place heavy books on bottom shelves to lower center of gravity, and position televisions far back on stands. For flat screens, use anti-tip straps that adhere to the TV’s rear VESA mount holes and loop around the stand’s base—no wall contact needed. Bundle cords with Velcro straps and tuck them behind furniture; a toddler pulling a visible cord can bring down a device weighing ten times their body weight.
Managing Cords, Cables, and Window Coverings
Rental window treatments are particularly dangerous. Corded blinds present strangulation risks, and heavy drapes can conceal floor heaters or unstable furniture. If cords exist, use adhesive cord winders to wrap them at least 5 feet high. For looped cords, cut them to eliminate the deadly loop, then install temporary cord cleats. Consider packing magnetic curtain tie-backs that attach to metal window frames, eliminating cord systems entirely. Always check behind drapes for radiators or baseboard heaters before allowing children near windows.
Fireplace and Heating Element Protection
Decorative fireplaces often have sharp hearth edges, hot glass fronts, or accessible gas keys. Use flexible foam edging that conforms to irregular stone or brick shapes—adhesion here is unreliable, so opt for weighted solutions or straps that loop around the entire hearth structure. For gas fireplaces, locate the shutoff valve (usually in the wall or floor nearby) and consider a portable valve cover that clamps over the handle. Never rely on screens; they’re designed for sparks, not toddler impact.
Room-by-Room Strategy: Kitchen and Dining
The kitchen combines toxicity, sharpness, and thermal hazards in a compact space. Your strategy must be invisible to hosts yet impenetrable to children.
Cabinet and Drawer Security Without Screws
Adhesive-mounted locks come in two effective designs: magnetic keys that release an internal latch, and dual-button releases requiring opposable thumb dexterity. The magnetic style offers cleaner aesthetics and works on any handle-less cabinet but requires keeping a key accessible to adults. For drawers, internal spring-loaded latches that grip the interior frame work universally. Avoid external strap locks that loop around knobs—they’re effective but scream “baby proofed” and may violate rental agreements about altering appearances.
Appliance and Dishwasher Management
The dishwasher is a triple threat: sharp knives, detergent pods, and hot steam. If it has a handle, use an appliance latch that adheres to the front panel and stretches over the handle. For button-operated models, a clear plastic shield that adheres around the control panel prevents activation. Refrigerators with water dispensers need outlet-level control—unplug the unit if possible, or use a dispenser lock that clips over the paddle. Always store the trash can inside a locked cabinet; rental trash cans are often large and tip-prone.
Securing Furniture and Breakables
Dining chairs become climbing structures the moment you turn around. Invert them on the table when not in use—this simple trick eliminates the temptation. For glass-fronted china cabinets, apply decorative window film that obscures contents and adds shatter resistance. Move decorative items above 4 feet high, grouping them on a single sturdy surface rather than scattering them throughout the space. This concentrates your monitoring efforts and reduces the “newness” appeal that drives toddlers to explore.
Room-by-Room Strategy: Bedrooms and Sleeping Areas
Sleep safety extends beyond the crib. The bedroom environment must protect a child who may wander in the dark or wake before you do.
Crib Safety in Rental Environments
Never assume a rental-provided crib meets current safety standards. If bringing a travel crib, you control the environment. If using a rental crib, perform the two-finger test: mattress-to-rail gaps should not allow two fingers to pass. Check for drop-side mechanisms (banned since 2011), loose hardware, and decorative cutouts that could trap limbs. Position the crib away from windows, blinds, and furniture a child could climb into. If the room has a ceiling fan, verify it’s on a low setting or disable it—toddlers can throw toys upward with surprising accuracy.
Securing Furniture and Window Areas
Dressers in rentals are notoriously unstable, often missing anti-tip hardware. Empty the bottom drawers completely and fill them with heavy items like books to lower the center of gravity. Use temporary drawer locks on top drawers containing hazards. For windows, install adhesive window stops that limit opening to 4 inches—these stick to the frame without drilling and remove without trace. If windows lack screens, keep them locked; rental screens are often flimsy and provide false security.
Closet and Dresser Hazards
Closet doors become finger-pinching hazards. Adhesive finger guards that stick to the jamb prevent full closure, creating a gap that protects tiny fingers. For sliding doors, a simple dowel rod in the track blocks movement. Inside closets, assume all cleaning products are toxic; even “natural” rentals may store bleach for turnover cleanings. Use a portable motion sensor alarm that chirps when the door opens, alerting you to unauthorized exploration.
Room-by-Room Strategy: Bathrooms
Bathrooms concentrate water risks, toxic substances, and hard surfaces in a small, slippery space. Your approach must be comprehensive yet removable.
Toilet and Water Safety
Toilet locks are non-negotiable; drowning can occur in two inches of water. Adhesive toilet seat locks work by gripping the bowl rim and lid, preventing opening. They’re universal but require cleaning the porcelain thoroughly first—mineral deposits from hard water prevent adhesion. For bathtub faucets, a cushioned spout cover that inflates or uses silicone straps protects against head injuries. Always test water temperature with your wrist, not your hand; rental water heaters are often set dangerously high for quick turnover between guests.
Securing Cabinets and Chemicals
Bathroom cabinets contain the highest concentration of toxins per square foot. Magnetic locks work well here since aesthetics matter less in utilitarian spaces. For pedestal sinks without cabinets, a freestanding storage tower with a weighted base and adhesive lock can be positioned strategically. Move all medications to your bedroom, locked in your suitcase—never trust a rental’s medicine cabinet to be empty or child-resistant.
Non-Slip Solutions and Temperature Control
Rental bathtubs are slip-and-fall zones. Inflatable non-slip mats provide suction-cup-free traction and roll flat for packing. For temperature control, if you can’t access the water heater, install a temporary thermostatic mixing valve on the shower arm—these screw on without tools and automatically limit hot water flow. Always run water for 30 seconds before bathing a child; stagnant water in pipes can be significantly hotter than the thermostat setting.
Critical Hazard Categories to Address
Certain dangers transcend room boundaries and require dedicated strategies. These are the hazards that cause the most serious injuries in rental environments.
Sharp Corners and Hard Edges
Every rental has a different edge profile—square, beveled, rounded, or ornate. Flexible gel corner guards conform to any angle and absorb more impact than rigid foam. For long edges like fireplace hearths or glass tables, use impact-absorbing tape that applies like masking tape but provides foam padding. The key is applying it after arrival but before unpacking, when you have clear access and your child is still contained.
Electrical Outlets and Cords
Tamper-resistant outlets are not yet universal in rentals. Sliding outlet covers that replace the entire plate are too permanent; instead, use external box covers that adhere around the outlet, encasing plugs completely. For unused outlets, simple plug covers work, but ensure they require two-handed removal—one-handed pull-off versions are toddler training tools. Extension cords are rental staples; never run them under rugs where heat builds up. Instead, use cord concealers that adhere to baseboards and have locking lids.
Stairs and Elevated Areas
Stairs are the leading cause of vacation rental injuries. Pressure-mounted gates work only at the bottom of stairs, never the top, where a child’s weight can dislodge them. For the top, you need hardware-free solutions like retractable mesh gates that use adhesive brackets rated for 200+ pounds of force. For open-concept stairs without walls on both sides, consider a portable play yard configured as a barrier, or improvise with a tension rod and mesh netting system that creates a soft but visible boundary.
Small Objects and Choking Risks
Rental properties accumulate small objects—previous guests leave behind batteries, coins, and toy parts in sofa cushions and under furniture. Conduct a “toddler-eye-view” scan: lie on the floor and look for anything smaller than a toilet paper tube. Pay special attention to decorative items like glass beads in vases, remote controls with battery compartments that pop open, and board games with small pieces. A portable handheld vacuum lets you suction hazards from under furniture without moving heavy pieces.
Poisonous Substances and Medications
Assume every liquid in a rental is toxic until proven otherwise. Hand soaps, dish detergents, and even “natural” cleaning products can be deadly. The garage or utility closet often holds the worst offenders: antifreeze, pesticides, and paint thinner. If you can’t lock these areas, use door knob covers that require squeezing and turning simultaneously. For medications, a simple pill organizer stored in your locked luggage is safer than relying on rental cabinetry.
Advanced Techniques for Stubborn Situations
Sometimes standard solutions fail. Advanced improvisation separates the prepared parent from the frantic one.
When Adhesives Won’t Stick
On textured walls, brick, or wallpaper, adhesives are unreliable. Switch to mechanical fastening: zip ties through cabinet handles, tension rods wedged in window frames, or Velcro straps that loop around entire furniture pieces. For outlet covers on textured walls, use a small amount of museum putty behind the plate—this archival-quality adhesive holds firm but removes with a gentle twist, never damaging surfaces.
Improvised Barriers and Blockades
Furniture can become barriers. Place a heavy ottoman in front of a dangerous cabinet, or wedge a suitcase between a child and a fragile display. Books stacked three-high create a surprisingly effective edge guard. For stairs without gate mounting points, a plywood sheet cut to fit the opening, padded with foam and propped with angled braces, creates a temporary wall. Always test stability by pushing with 30 pounds of force—if it holds, it’ll stop a toddler.
Creative Repurposing of Household Items
A pool noodle slit lengthwise fits over any edge, secured with double-sided carpet tape that removes cleanly. Silicone baking mats, rolled and taped, make excellent faucet covers. A shower curtain tension rod with hanging fabric creates a soft room divider. Your suitcase’s strap can secure a toilet lid; your beach towel can pad a sharp corner. The key is seeing materials for their properties (soft, heavy, adjustable) rather than their intended use.
The Minimalist Approach: Priority-Based Baby Proofing
You don’t need to secure everything—just the things that cause permanent harm. This section helps you triage when time, weight, or patience is limited.
The 80/20 Rule for Vacation Safety
Twenty percent of hazards cause eighty percent of serious injuries. Focus on: stairs, water (toilets, tubs, pools), tipping furniture, and toxins. These four categories address drowning, brain injury, and poisoning—the three leading causes of vacation-related child fatalities. A simple gate, toilet lock, furniture straps, and cabinet locks solve 80% of life-threatening risks in under 30 minutes. Everything else is risk reduction, not risk elimination.
Focusing on Life-Threatening Hazards First
Create a 10-minute arrival protocol: 1) Secure the top of stairs, 2) Lock toilets, 3) Strap heavy furniture, 4) Lock cabinets with chemicals, 5) Scan for small objects. Do this before unpacking a single bag, while your child remains in a play yard or carrier. This sequence protects against the worst outcomes while giving you mental space to address lesser hazards later. Remember, a bruised shin from a coffee table heals; a tumble down unguarded stairs may not.
Host Relations and Liability Considerations
Your safety measures must coexist with rental agreements and liability concerns. Smart navigation prevents conflicts and protects you legally.
What You Can and Cannot Modify
Read your rental agreement’s alteration clause. Most prohibit “permanent changes” but allow “temporary safety modifications.” Document everything in writing before arrival. Send your host a list: “We’ll be using adhesive cabinet locks, tension gates, and corner guards, all guaranteed to remove without damage.” Offer to purchase specific paint for touch-ups if needed. This proactive communication transforms you from a risky guest to a responsible parent.
Documenting Pre-Existing Conditions
Before installing anything, photograph every surface in detail. Capture existing paint chips, wall scuffs, and furniture wear. Time-stamp these photos and email them to yourself and the host. When you remove your safety gear, photograph again. This documentation is your only defense against unfounded damage claims. Pay special attention to wallpaper edges and painted trim—hosts scrutinize these areas during checkout inspections.
Insurance and Liability Implications
Your homeowner’s insurance may not cover incidents in rentals. Consider short-term travel insurance with liability coverage specifically for vacation rentals. If your child is injured due to a rental’s negligence (unstable furniture, exposed wiring), your temporary safety modifications could be cited as evidence you recognized risks. Conversely, if your installation damages property, you’re liable. Keep product packaging showing “safe for all surfaces” claims—these can be used in disputes if a host alleges damage from a product marketed as non-damaging.
Age-Specific Considerations
A nine-month-old crawler faces different threats than a twenty-month-old climber. Tailoring your approach to developmental stage maximizes efficiency.
Crawlers vs. Walkers: Different Threat Profiles
Crawlers (6-12 months) operate at ground level, focusing on outlets, small objects, and cabinet contents. Their limited reach means securing the first 24 inches of vertical space suffices. Walkers (12-24 months) access surfaces, climb furniture, and open doors. They require full-room securing, with emphasis on tipping hazards and door controls. A crawler needs outlet covers; a walker needs door knob covers and furniture straps.
Mobile Infants (6-12 months)
At this stage, oral exploration dominates. Prioritize choking hazards and toxins. Pack extra outlet covers and cabinet locks. These infants lack the strength to dislodge pressure-mounted gates but can crawl through surprisingly small openings. Measure openings before your trip; a gate rated for 28-42 inches won’t fit a 27-inch hallway. Bring an expandable mesh gate for irregular openings.
Toddlers on the Move (12-24 months)
This group combines mobility with problem-solving. They defeat simple latches, climb over low gates, and open unlocked doors. Upgrade to magnetic cabinet locks they can’t see to manipulate. Use door alarms that beep when opened, alerting you to unsupervised wandering. Remove all furniture that can be used as stair-stepping tools away from gates and barriers. Their height means securing surfaces up to 36 inches, and their weight (20-30 pounds) requires furniture anchoring that holds 100+ pounds of force.
Packing and Organizing Your Baby Proofing Arsenal
Efficient packing determines whether you’ll actually bring everything you need. A disorganized kit gets left behind.
The Compact Kit Strategy
Use a clear, rigid container that fits in your suitcase’s lid compartment or carry-on. Organize by room: living area items in one zip-top bag, kitchen in another. This lets you grab the kitchen bag and secure that space completely before moving on. Include a small spirit level—proper gate installation requires vertical alignment, and a tilted gate fails under pressure. Pack a microfiber cloth for surface prep; dust is the enemy of adhesion.
Labeling and Inventory Systems
Create a laminated packing list with checkboxes. As you install items, check them off. When repacking, the list ensures nothing gets left behind in drawers or behind furniture. Label each item with its location (e.g., “Cabinet lock—kitchen, left of sink”). This speeds removal and helps you remember where you installed 15 identical adhesive pieces. Use painter’s tape for temporary labels—it won’t leave residue on your gear.
Weight and Space Optimization
Every ounce counts when flying. Choose items made from modern polymers over metal where possible. A tension gate using carbon fiber weighs half as much as aluminum. Silicone corner guards roll flat; foam ones are bulky. Instead of bringing a full tool kit, pack a multi-tool with a built-in level and screwdriver. Pre-cut adhesive strips to size rather than bringing full rolls. The goal is a complete kit under 1.5 pounds that occupies less space than a pair of shoes.
Installation and Removal Best Practices
Proper technique ensures safety during your stay and a full security deposit return afterward.
The 24-Hour Adhesion Test
Install all adhesive products immediately upon arrival, then wait 24 hours before trusting them. During this period, adhesives achieve full bond strength. Test each by pulling with moderate force—if it fails, reinstall with better surface prep or switch to a tension solution. Mark the installation time on a note; don’t rely on memory when jet-lagged. This test period is why early arrival or sending one parent ahead is invaluable.
Clean Removal Techniques
Removal technique determines damage. Always pull adhesive strips parallel to the surface, never away from it. Use a slow, steady motion—jerking causes paint lift. If resistance is high, use dental floss in a sawing motion behind the adhesive to separate it from the surface. For residue, apply a small amount of cooking oil, let sit for five minutes, then wipe with a microfiber cloth. Never use Goo Gone or similar solvents; they can damage finishes. Finish by cleaning with the same alcohol wipe you used for installation.
Damage Prevention Protocols
In hot climates, remove adhesives the night before checkout to avoid heat-softened residue. In cold climates, warm the adhesive with a hair dryer on low for 30 seconds before removal—this restores flexibility and prevents cracking that takes paint with it. If a corner guard pulled paint, have a small tube of matching paint ready. Most rental agreements allow “minor touch-ups” if they match perfectly. Photograph the post-removal condition as thoroughly as you documented pre-installation.
Troubleshooting Common Scenarios
Even perfect planning encounters curveballs. These solutions address the most common rental-specific challenges.
Textured Walls and Tricky Surfaces
For heavily textured walls, skip adhesives entirely. Use tension-based solutions or freestanding barriers. Command hooks designed for brick (they have more aggressive adhesive) can sometimes grip texture, but test first. An alternative is magnetic paint—apply a small strip where you need adhesion, let it cure, then use magnetic locks. This is a semi-permanent modification, so get explicit written host approval first.
Outdoor Areas and Balconies
Balcony railings often exceed safe spacing (4-inch maximum). Use mesh netting designed for pet safety, zip-tying it to railings—this is usually considered a temporary addition. For ground-level patios, a portable pop-up play yard creates a safe zone. Always check for toxic plants; many rentals have oleander, azaleas, or sago palms that are deadly if ingested. A plant identification app lets you quickly assess greenery.
Multi-Level Homes and Staircases
Split-level homes with three or four short staircases are nightmares for gate installation. A retractable gate mounted at the main level’s entrance, combined with door knob covers on lower-level doors, often proves more practical than securing each staircase. For open-tread stairs (popular in modern rentals), a solid barrier is essential—a child can slip through the gap between treads. Use a sheet of rigid foam board, covered in fabric for aesthetics, wedged between the handrails.
Frequently Asked Questions
How far in advance should I start planning my vacation rental baby proofing strategy?
Begin your assessment immediately after booking, ideally 4-6 weeks before travel. This allows time to research the property, communicate with your host, order any specialized items, and practice installation techniques in your own home. Early planning also lets you request specific photos or measurements from the host, which they’re more likely to provide with advance notice.
What’s the single most important item to pack for temporary baby proofing?
A high-quality tension-mounted gate with adjustable width and pressure indicators. This one item can secure stairs, doorways, and even serve as a barrier for hearths or wide openings. Choose a model with adhesive mounting cups to prevent wall damage and ensure it fits openings from 28 to 48 inches for maximum versatility.
Can I really trust adhesive products to hold furniture without damaging walls?
When used correctly on compatible surfaces, modern adhesive furniture straps are rated for 100-200 pounds of force and remove cleanly within 30 days. The critical factors are surface preparation (clean with alcohol), proper installation (hold for 60 seconds), and allowing 24-hour cure time. However, they’re not suitable for wallpaper, textured walls, or surfaces that will be exposed to extreme heat or moisture.
How do I handle baby proofing when flying with limited luggage space?
Focus on the 80/20 rule: pack only life-safety items (gate, toilet lock, cabinet locks, corner guards). Choose ultra-light silicone or polymer versions. Ship a small box of supplies to your rental ahead of time—many hosts will hold packages. Alternatively, purchase items upon arrival from a national retailer with easy returns, then donate what you can’t pack back.
What should I do if my host refuses to allow any baby proofing modifications?
This is a red flag. Politely explain that all products are non-damaging and removable, offering to send product specifications. If they still refuse, consider whether the property is suitable for your child’s age and mobility. A host who won’t accommodate temporary safety measures may have liability concerns or previous damage disputes. Your child’s safety outweighs any rental agreement.
Are there any hazards unique to vacation rentals I might overlook?
Yes—previous guests’ belongings. Check under furniture, behind curtains, and in sofa cushions for batteries, pills, vape pens, and small toy parts. Also inspect for improperly stored owner items: unlocked gun cabinets, tools in closets, or medications in bathroom vanities. Always check the water heater temperature, as rentals often set them high for guest satisfaction, creating scald risks.
How can I baby proof a rental with open-concept design and few walls?
Use freestanding barriers and strategic furniture placement. Configure sofas and heavy chairs to block access to kitchen or stair areas. Retractable mesh gates can span up to 6 feet between any two solid points, including stair railings and furniture legs. Consider a large portable play yard that creates a safe zone in the main living area, allowing your child freedom within defined boundaries.
What’s the best way to secure cabinets that have no handles or knobs?
Magnetic locks are ideal for handle-less cabinets. They install inside with adhesive, remaining invisible externally. The magnetic key releases the latch. For a no-installation option, use a strap that wraps around the entire cabinet, securing with a combination lock or complex clip. Another method is placing a heavy object in front of critical cabinets, though this is less reliable with determined toddlers.
How do I test if a surface will hold adhesive without damage?
Apply a piece of painter’s tape (the blue delicate-surface type) to an inconspicuous area. Press firmly and wait one hour. Remove it with a slow, parallel pull. If paint adheres to the tape, the surface is too delicate for any adhesive product. If it removes cleanly, proceed with confidence. Always test in a corner or behind furniture where any potential damage would be hidden.
Is it worth renting baby proofing equipment at my destination?
Rental services exist in major tourist areas, but quality varies dramatically. Rented items may be worn, missing parts, or outdated. The convenience is offset by the time spent coordinating pickup and return. For longer stays (2+ weeks) or when flying internationally where packing is restricted, rental makes sense. For typical week-long domestic trips, bringing your own curated kit ensures reliability and familiarity with installation.